If you are interesting, check out below about Syndicate Kahuna Installation :
- Syndicate Kahuna currently only works with WordPress blogs installed on your own domain. If you are using a service like Wordpress.com, it will not work. It also does not work with WordPressMU (multi-user).
- Your server that hosts your domain must have “Zend Optimizer” installed. If it does not, then you can simply email your hosting support and ask them to install it for you. It takes just a few moments.
- SyndicateKahuna is a “PHP” script and will not work on “Windows” based servers. (This has nothing to do with your personal computer, just the hosting account).
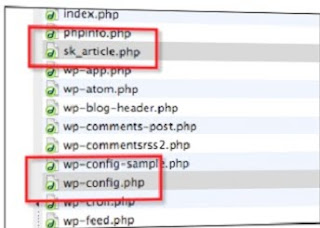
- Step 1: Download the syndicate Kahuna script to your computer. This script is saved as a zip file and will save to your computer as
“sk_article.zip”. You will need to unzip this file and then extract the file
“sk_article.php” and save that to your computer.
- Step 2: Open your favorite FTP software and login into your hosting account.
A FTP software is used to send and receive files from your server where your blog is hosted. There are many excellent free options available and the two I recommend are :
• http://fireftp.mozdev.org/ (if you use the firefox browser)
• http://www.coreftp.com/
- Step 3: You need to ensure that you set your FTP options to upload the files in “Binary” mode. There are three options to choose from in our FTP software, they are ASCII, Binary and Auto… you NEED to select Binary.
- Step 4: Upload the file sk_article.php to the folder on your server that also has the file wp_config.php
- Step 5: Enter the following into your browser…
Make your to replace “yourdomain” with your sites actual domain.
If the page redirects to the yourdomain.com, then it is installed correct. If you get an error then that “Zend Optimizer” is not installed, then you will need to contact your hosting provider to get it installed. Any other errors, would indicate that you did not upload the script in “Binary” mode.
- Step 6: In SyndicateKahuna, go to the “Add Site” page and enter in the “site name” (Pick a name to help identify your site in the site listings) and “site url”.
- Step 7: Select “Test Script” to ensure your site is set up proper.
- Step 8: Select the categories for the types of articles you want to receive. You can select up to 10 categories max and if you have a niche site you can further refine the types of articles your site receives by specifying keywords in the next step.
- Step 9: Enter up to 5 keyword phrases to further refine the articles that your blog will receive. Only articles whose keywords match some or all of your keywords will be delivered to your site. You can only enter 1 keyword phrase per box or group of keywords but you can use “AND” with your keywords (GPS AND navigation) so only articles matching both keywords will be delivered. By using the “AND” the keyword do not have to be together as one phrase but they both must appear in the content.
IMPORTANT:
- Do not use commas in your keyword phrases (anything after the comma will be truncated)
- Capitalization does not matter (GPS will match gps)
- If you leave all the keyword fields blank, any articles matching your categories will be delivered
- Step 10: Enter the maximum number of articles per day you would like your site to receive. You can request up to 10 articles per day.
- Step 11: Select whether or not the articles your site receives are immediately available to the public.
- Publish - The articles your site receives are immediately visible on your site
- Pending Review - You need to approve (publish) the articles your site receives before they will be visible to the public
- Step 12: Sets the version of Wordpress your blog is running.


