Sometimes
Google adsense displays non relevant ads in our blog or website. This is one of the common complaints about Adsense that the ads displayed are not relevant to the website’s content. Basically AdSense program enables website publishers to change display Google ads to be relevant to their site color. Non-targeted ads will annoy our readers and also reduce our earning potential as our readers may not interested in the ads displayed.
To overcome this issue, Google has a feature called section targeting. This is the simple way to improve our Adsense targeting.
Here is the quote from the Adsense Help Center about this issue :
Section targeting allows you to suggest sections of your text and HTML content that you’d like us to emphasize or downplay when matching ads to your site’s content. By providing us with your suggestions, you can assist us in improving your ad targeting.
It’s simple to implement Section Targeting in our blog, we have to place a HTML tag before and after the content that we want adsense ads to be targeted.
<!– google_ad_section_start –>
YOUR CONTENT FOR SECTION TARGETING GOES HERE.
Most of your website main content resides here.
<!– google_ad_section_end –>
How to Ignore Section Targeting
We can mark sections that we want adsense ignore section targetting (content to be weighted less, ex RSS Web Feeds, sidebar links, etc.,)
<!– google_ad_section_start(weight=ignore) –>
IGNORE. This content is weighted less.
<!– google_ad_section_end –>
You have to use this feature carefully, make sure you start and close the tag properly. Also, you cannot manipulate the section ad targeting by placing insignificant content, as it is against adsense program policies
How to Implement The Code in Our Old Post in Blogspot
Here are the steps :
1. Login to Blogger using our ID
2. Click on a POSTING, choose EDIT POST
3. Choose the published post where you want to implement the code
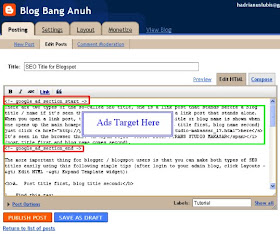
4. Click on the "EDIT HTML" so the view is on the HTML style
5. Oke, now you see which sentence or paragraph you want to be targeted